
728x90
Docker Container로 간단히 구동하기
참고: https://minimilab.tistory.com/62
Docker Image Pull
| docker pull fluent/fluentd:edge-debian |
Fluentd 설정 파일 생성
http input을 stdout으로 출력하는 형식
$ sudo vi fluentd.conf
| <source> @type http port 9880 bind 0.0.0.0 </source> <match **> @type stdout </match> |
Docker Run
| # RUN $ sudo docker run -d --name fluentd -p 9880:9880 -v $(pwd):/fluentd/etc fluent/fluentd:edge-debian -c /fluentd/etc/fluentd.conf # http call $ curl -X POST -d 'json={"json":"message"}' http://127.0.0.1:9880/sample.test # 로그 확인 $ sudo docker logs -f fluentd |
Kafka 플러그인 설치
| # root 권한 bash로 진입 $ docker exec -it -u root fluentd bash #현재 설치된 플러그인 확인 $ gem list #플러그인 설치 $ gem install fluent-plugin-kafka docker exec -u root fluentd sh -c "apt update; apt install gcc make -y ; gem install fluent-plugin-kafka" |
참고: https://eyeballs.tistory.com/417
fluentd와 kafka를 연동하려면 플러그인 설치가 필요하다.
그리고 이를 이미지화 하려면 Dockerfile을 작성하여 커스텀 이미지로 만들어야 한다.
Fluentd와 Kafka를 연동하기 위한 Dockerfile 생성
DockerFile
| FROM fluent/fluentd:edge-debian # Use root account to use apt USER root RUN buildDeps="sudo make gcc g++ libc-dev" \ && apt-get update \ && apt-get install -y --no-install-recommends $buildDeps \ && sudo gem install fluent-plugin-kafka |
Build
| # Docker Build $ docker build {경로} -t {이미지명} # 예시 $ docker build ./ -t jaeshim-fluentd-kafka # Docker Image 목록 확인 $ docker image ls |
플러그인 설치 확인
| # fluentd cotainer root 권한으로 접근 $ docker exec -it -u root fluentd bash # 플러그인 설치 확인 $ gem list | grep kafka fluent-plugin-kafka (0.18.1) ruby-kafka (1.5.0) |
설치된 플러그인:
- fluent-plugin-kafka (0.18.1)
- ruby-kafka (1.5.0)
docker-compose.yml
| version: '2.2' services: fluentd: container_name: fluentd image: jaeshim-fluent-kafka environment: - FLUENTD_CONF=fluentd.conf ports: - 9880:9880 volumes: - ./:/fluentd/etc zoo1: image: confluentinc/cp-zookeeper:7.1.2 container_name: zoo1 ports: - "2181:2181" environment: ZOOKEEPER_CLIENT_PORT: 2181 ZOOKEEPER_SERVER_ID: 1 ZOOKEEPER_SERVERS: zoo1:2888:3888 kafka1: image: confluentinc/cp-kafka:7.1.2 hostname: kafka1 container_name: kafka1 ports: - "9092:9092" environment: KAFKA_ADVERTISED_HOST_NAME: kafka1 KAFKA_ADVERTISED_LISTENERS: LISTENER_DOCKER_INTERNAL://kafka1:19092,LISTENER_DOCKER_EXTERNAL://${DOCKER_HOST_IP:-127.0.0.1}:9092 KAFKA_LISTENER_SECURITY_PROTOCOL_MAP: LISTENER_DOCKER_INTERNAL:PLAINTEXT,LISTENER_DOCKER_EXTERNAL:PLAINTEXT KAFKA_INTER_BROKER_LISTENER_NAME: LISTENER_DOCKER_INTERNAL KAFKA_ZOOKEEPER_CONNECT: "zoo1:2181" KAFKA_BROKER_ID: 1 KAFKA_LOG4J_LOGGERS: "kafka.controller=INFO,kafka.producer.async.DefaultEventHandler=INFO,state.change.logger=INFO" KAFKA_AUTHORIZER_CLASS_NAME: kafka.security.authorizer.AclAuthorizer KAFKA_ALLOW_EVERYONE_IF_NO_ACL_FOUND: "true" depends_on: - zoo1 kafka-ui: container_name: kafka-ui image: provectuslabs/kafka-ui:latest ports: - 8080:8080 depends_on: - zoo1 - kafka1 environment: KAFKA_CLUSTERS_0_NAME: local KAFKA_CLUSTERS_0_BOOTSTRAPSERVERS: kafka1:19092 KAFKA_CLUSTERS_0_ZOOKEEPER: zoo1:2181 KAFKA_CLUSTERS_0_JMXPORT: 9997 |
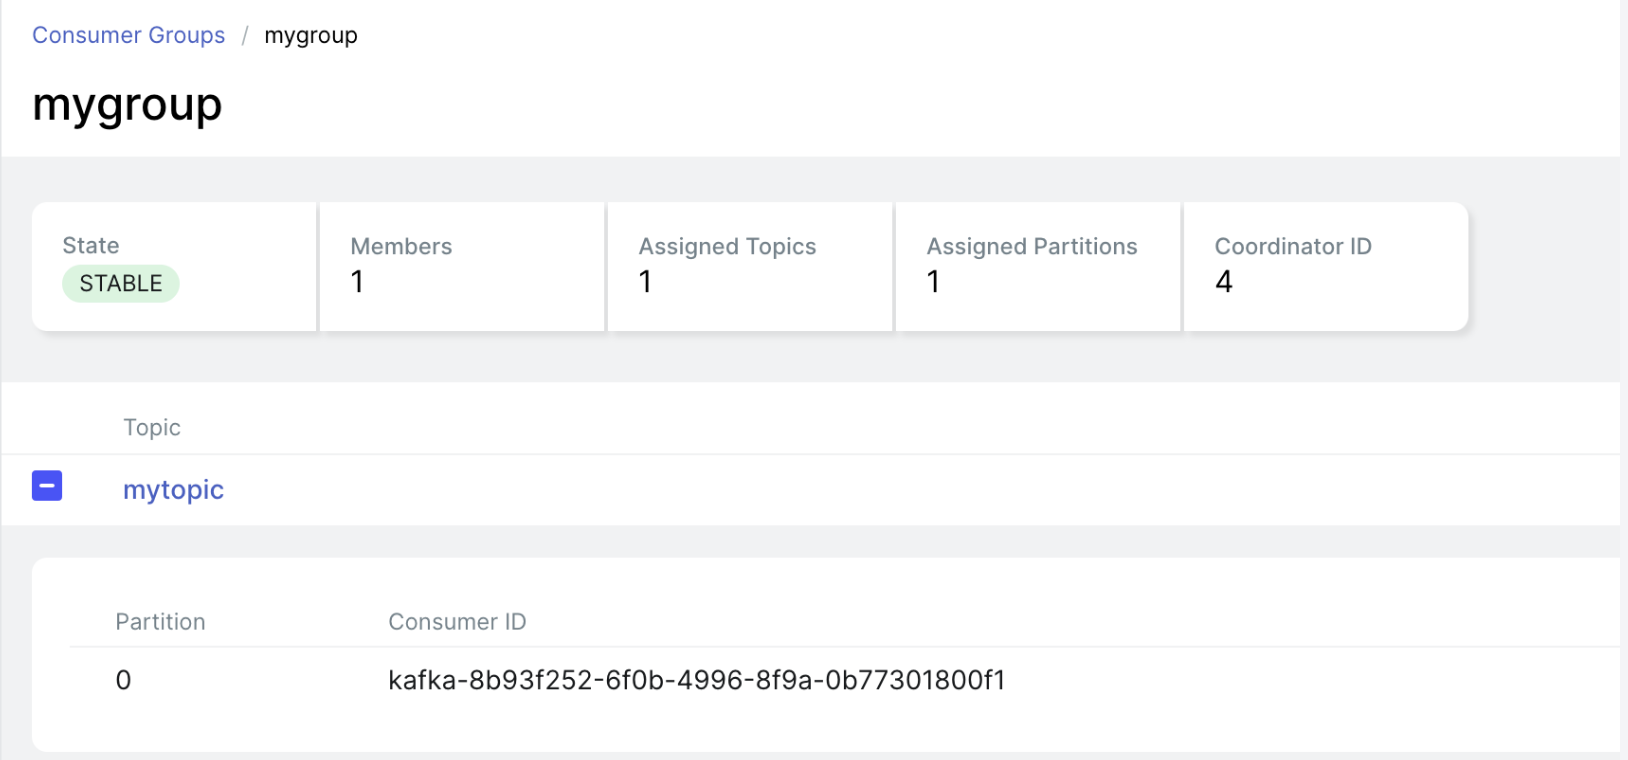
예제1) 카프카에서 메시지 Consume 후 stdout
- input: http (fluentd)
- output: kafka
fluentd.conf
| <source> @type kafka_group brokers kafka1:19092,kafka2:19093,kafka3:19094,kafka4:19095 topics "mytopic" consumer_group mygroup add_prefix kafka start_from_beginning true </source> # 태그는 kafka.[topic 이름]이 된다. # 여기서는 kafka.mytopic <match kafka.mytopic> @type stdout </match> |
Consumer Group 확인
Kafka Admin에서 메시지 생성
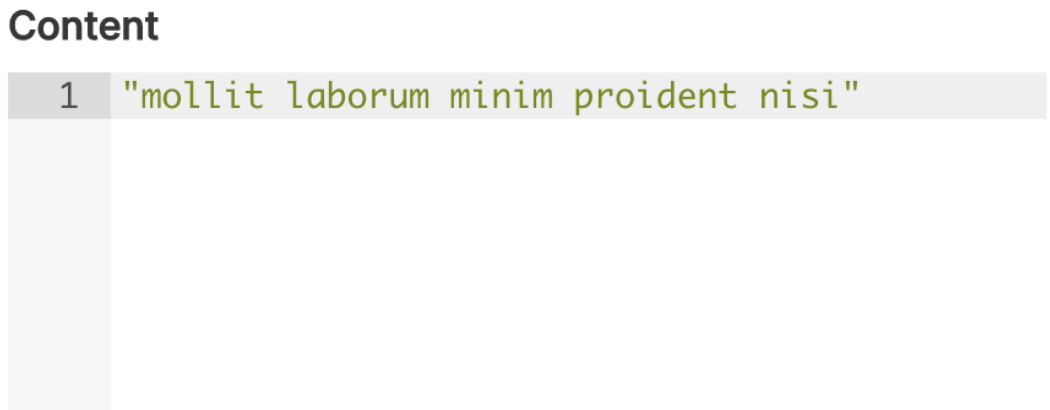
-> 파싱이 되지 않는다는 오류 발생

JSON 형식으로 생성
{"test": "vitamin"}
-> 파싱 성공
예제2) http로 메시지를 받고 카프카에 Produce
- input: kafka
- output: stdout
fluentd.conf
| # http msg -> fluentd -> kafka # http message 를 받는다. <source> @type http port 9880 bind 0.0.0.0 </source> # http.msg 태그로 match 한다. <match http.msg> @type kafka # list of seed brokers # 여기서 brokers 의 ip 가 kafka 인 이유는, Docker Swarm 때문이다. brokers kafka1:19092 use_event_time true # <buffer> # @type file # path /fluentd/buffer # flush_interval 3s # </buffer> # topic settings # topic_key 는 토픽명 # default_topic 은 topic_key 가 없을 때 사용되는 default 토픽명 topic_key mytopic default_topic mytopic <format> @type json </format> # producer settings required_acks -1 </match> |
| # curl로 JSON 메시지 생성 $ curl -X POST -d 'json={"json":"test", "sample":"hello world!"}' http://localhost:9880/http.msg |
Kafka Admin에서 메시지 생성 확인

참고:
Docker fluentd : https://hub.docker.com/r/fluent/fluentd/
docker deployment 공식 fluentd 문서 : https://docs.fluentd.org/container-deployment/install-by-docker
kafka output plugin 공식 fluentd 문서 : https://docs.fluentd.org/output/kafka
fluent-plugin-kafka plugin : https://github.com/fluent/fluent-plugin-kafka
kafka 기초 명령어 : https://kafka.apache.org/quickstart
728x90
'Fluentd' 카테고리의 다른 글
| Fluentd 개념정리 (0) | 2024.08.08 |
|---|

댓글